• Welcome to the CaliforniaSpecial.com forums! - You are currently viewing the forums as a GUEST. To take advantage of all our site features, please take a moment to join our community! It's fast, simple and absolutely free.

    If you have problems registering or can't log into your account, please contact Admin.

    Please Note: If you are an existing member and your password no longer works, click here to reset it.

1968 Opinion PB Poster

Forsche

Well-known member
Joined
Jan 12, 2013
Messages
219
Need an opinion from some of you that are far more knowledgeable on these issues. Our CS was originally a power brake car. It still has the PB pedal but the original owner at some point removed the booster and just used manual brakes. We bought a restored booster. I was having someone put it on but they hesitated tearing into it since they said it looked like the clearance tolerances were very close and might not be there right booster?. Wondered if this was the right booster. Can you tell from the pics. Also how do I know if this master cylinder will work? thanks
 

Attachments

  • securedownload-24.jpeg
    securedownload-24.jpeg
    99.1 KB · Views: 29
  • securedownload-23.jpeg
    securedownload-23.jpeg
    123.6 KB · Views: 26
  • securedownload-22.jpeg
    securedownload-22.jpeg
    120.4 KB · Views: 28
  • photo.JPG
    photo.JPG
    83.2 KB · Views: 26
Last edited:

limelyt

Well-known member
Joined
May 24, 2006
Messages
308
Location
Calgary, Alberta CANADA
yep everything looks right you should not have a clearance issue. the master cylinder should end up about 1/8 to 1/4" away from the shock tower
 

dalorzo_f

Well-known member
Joined
Jan 7, 2006
Messages
1,886
Location
Brisbane Australia
You need to be sure you have the correct master cylinder and push rod. The manual and power are slightly different and I do not believe they swap out...

The tolerances are close, but if you have a small block its pretty easy, a big block is very tight . Removing the shock tower brace or export brace, if you have one, makes it easier...
 

robert campbell

Well-known member
Joined
Apr 10, 2007
Messages
4,321
There are two styles of power brake boosters. The one you have is a "Midland Ross". Identified by the "belly band" around it that holds the two halves together. The other one is from "Bendix". It is about the same size but is a bit different looking.

Now for the concurs experts to weigh in. The Midland Ross was very common in the 1967 line and then "to my knowledge" started to fade out and be replace by Bendix style ones in 1968. Also, many cars that had units fail over the years got Bendix replacements. Both styles are offered as 1967/1968 replacements. My 1968 GNS has a Bendix and Val's 1967 Fastback came with a Midland Ross

This may not be important to you, but I think early GT/CS and HSC cars may have had the best chance of Midland Ross with the later 1968 ones with Bendix.

Or it may have been a potpourri, or? As all GT/CS cars came from San Jose, it should not be a Ford plant issue.

I see you have just the booster pictured. When you install the master cylinder to it the rod that comes out of the booster and pushes on the master cylinder has a specific adjustment. We can go into that later.

Rob

Rob
 

Mosesatm

Well-known member
Joined
Jan 18, 2005
Messages
9,029
Here's a photo of my J-code that shows how close the master cylinder is to the shock tower. Installing it without scratching the shock tower is a bit of an adventure.
 

Attachments

  • Borgeson.jpg
    Borgeson.jpg
    166 KB · Views: 39

dalorzo_f

Well-known member
Joined
Jan 7, 2006
Messages
1,886
Location
Brisbane Australia
No expert but I have long thought the Midland was '68 and the Bendix not used until '69. ('68 shop manual only notes Midland, not that that is categorical proof)

???

For install make sure you have the master cylinder on the booster, far easier than doing them separately. Angle the assembly up-and-in and work it in place , it should clear with about 1/4" to spare. Why Ford made the booster so deep is unknown, really not required.

And on the Midland the rod is part of the booster, as shown. They don't pull out of the opening. I think it is part of the master cylinder on manual ones, thus the difference.

The adjustment is the nut on the end of the rod, you want the tip of the nut 0.980"-0.995 from the face of the air filter.
 

Ruppstang

Well-known member
Joined
May 22, 2009
Messages
3,034
No expert but I have long thought the Midland was '68 and the Bendix not used until '69. ('68 shop manual only notes Midland, not that that is categorical proof)

+1 Midlands the only correct one for 68.
Marty
 
OP
OP
F

Forsche

Well-known member
Joined
Jan 12, 2013
Messages
219
Thanks for the info, everyone. One additional question....is this a complicated install for a weekend mechanic? I would say I'm a very handy person but not in any way an experienced mechanic. What is the level of difficulty? Dare I try this install myself?
 

dalorzo_f

Well-known member
Joined
Jan 7, 2006
Messages
1,886
Location
Brisbane Australia
Not really complicated. A mid level DIY project. I'd rate it a 5 out of 10.

Getting the pedal assembly connected is "difficult" just because there is poor access for the old and unbendable. :tongue:

IMO the biggest PITA is bleeding the system. Other than that is only a few nuts and bolts to get the master on the booster and the booster on the firewall. Connect the pedal, connect the lines, bleed...

If you use a new master (you will probably have to) bench bleed it before installing.
 
OP
OP
F

Forsche

Well-known member
Joined
Jan 12, 2013
Messages
219
Not really complicated. A mid level DIY project. I'd rate it a 5 out of 10.

Getting the pedal assembly connected is "difficult" just because there is poor access for the old and unbendable. :tongue:

IMO the biggest PITA is bleeding the system. Other than that is only a few nuts and bolts to get the master on the booster and the booster on the firewall. Connect the pedal, connect the lines, bleed...

If you use a new master (you will probably have to) bench bleed it before installing.

Thanks for the info Dalorzo. Is there any way I can tell if the master that is on the car is the original? If so I'd like to try to use that. I'll do some research but also would be interested in knowing more about the process of bleeding the brakes. I've never done it but always intrigued with knowing the process. As I require the tools to do it are fairly affordable?
 

dalorzo_f

Well-known member
Joined
Jan 7, 2006
Messages
1,886
Location
Brisbane Australia
It is highly unlikely to be original as a manual and power are different units. Unless someone cobbled up a rod to match to a power MC, I guess it "could" be done, never looked into it.

I'm not familiar with the marking unique to a OEM, and have never seen a date code on one. But maybe others can clarify.

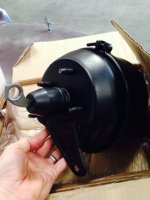
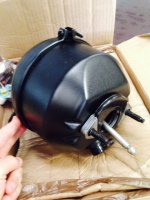
In reality, if it is original and its 46 years old its probably due for replacement. No sense going thru all the hassle of swapping it out and bleeding the brakes just to have it go bad and need replacing later. If it fits (big if) best to pull the plunger out of the bore (requires snap ring pliers) and check the bore. Rebuild kits are inexpensive, but if any scoring or pitting or rust is evident in the bore, replace the unit.

They can be rebuilt but its usually far more expensive to have one redone as to buying a correct remanufactured unit. (here is stupidly expensive, I was quoted $350 to re-sleeve one... went for a remanufactured unit instead)

As for tools;

- brake line flare wrenches for master cylinder and bleeders
- open end wrenches
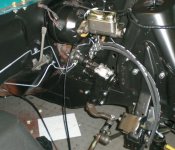
- sockets and extensions (long extension help under the dash fitting the unit to the firewall)
- small funnel and fender/apron protection to avoid drips on your paint

Plenty of sites on the web on bleeding brakes, some prefer gravity method, some pedal pressure, some vacuum assisted.

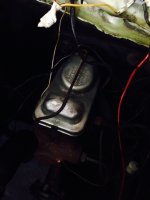
I like the "pedal" method and this litte tool makes the job a lot easier. Keeps the distribution block switch in place when beeding.

use a centering pin on the distribution block - http://www.npdlink.com/store/produc...ntial_valve_switch_lock_tool-178818-2981.html

On that note, if you have the rest out you should check the block and ensure the switch is working during the refit.
Really all pretty standard weekend mechanic stuff.
 
Last edited:

robert campbell

Well-known member
Joined
Apr 10, 2007
Messages
4,321
Take the driver seat out. It is 4 nuts. Unless you are a 20 to 30 year old gymnast. At 59 years old, I am no longer bendy... I use a combo of the pedal and vacuum method. Do not get the brake fluid on your paint. It is great paint remover...

Of note to the experts, is a 68 manual and power brake pedal support the same? In 1967 they are different if I remember correct.

Rob
 

CougarCJ

Well-known member
Joined
Jul 17, 2006
Messages
2,189
Take the driver seat out. It is 4 nuts. Unless you are a 20 to 30 year old gymnast. At 59 years old, I am no longer bendy... I use a combo of the pedal and vacuum method. Do not get the brake fluid on your paint. It is great paint remover...

Of note to the experts, is a 68 manual and power brake pedal support the same? In 1967 they are different if I remember correct.

Rob

The hanging brackets are physically the same by 1968. Meaning they are drilled for the disc brake pedal, and have bushings for the clutch and / or the shorter drum brake pedal. Visually, the difference is that the disc brake hanger came with one captured nut, the drum brake versions came with 4 captured nuts at the firewall flange. They can be removed, but not as easily as you would think.
 
Top