• Welcome to the CaliforniaSpecial.com forums! - You are currently viewing the forums as a GUEST. To take advantage of all our site features, please take a moment to join our community! It's fast, simple and absolutely free.

    If you have problems registering or can't log into your account, please contact Admin.

    Please Note: If you are an existing member and your password no longer works, click here to reset it.

1968 Frame Detailing - Please comment

x-codegtcs

Well-known member
Joined
Sep 5, 2002
Messages
549
Location
Kaysville, UT
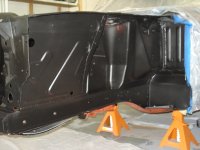
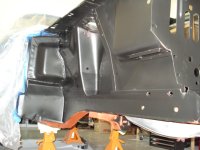
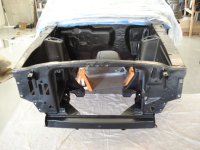
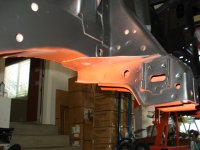
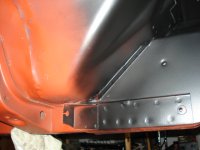
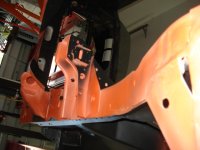
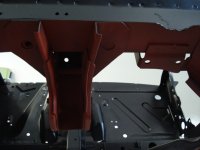
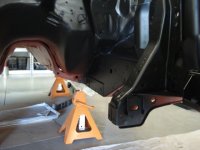
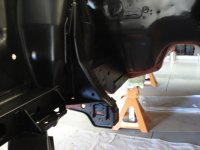
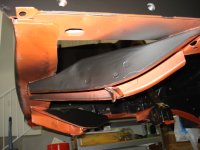
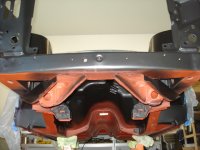
OK - so I finished prepping the engine compartment and found that I had a few areas that needed additional detailing, so I quickly re-shot some more of the "rust primer" and then shot the black. Here are photos of the finished product. I would like all the reviews I can get on how concours correct this is. I am not making the car a concours car, because I want to drive it on a daily basis without really worrying about getting too dirty. BUT I do want to make the car as correct as possible within reason. So, please give me some comments so I can learn from this. Thanks!!!
 

Attachments

  • DSC07534.JPG
    DSC07534.JPG
    59 KB · Views: 70
  • DSC07541.JPG
    DSC07541.JPG
    149.5 KB · Views: 70
  • DSC07540.JPG
    DSC07540.JPG
    154.7 KB · Views: 68
  • DSC07539.JPG
    DSC07539.JPG
    134.9 KB · Views: 71
  • DSC07538.JPG
    DSC07538.JPG
    150.6 KB · Views: 68
  • DSC07537.JPG
    DSC07537.JPG
    75.4 KB · Views: 73
  • DSC07536.JPG
    DSC07536.JPG
    133.4 KB · Views: 71
  • DSC07535.JPG
    DSC07535.JPG
    143.9 KB · Views: 75
  • DSC07542.JPG
    DSC07542.JPG
    148 KB · Views: 69
  • DSC07543.JPG
    DSC07543.JPG
    151.2 KB · Views: 79

6t8-390gt

Well-known member
Joined
Jul 19, 2004
Messages
490
Location
Central Virginia
It looks good; personally I would blow more black under the car. The separation lines in some places looks too deliberate to me. Although every car was different!

On the outside of the aprons you should have body color up to the shock towers. Usually some primer was showing through in the shock tower itself and the black paint covered the front apron and flowed back to the shock tower.

A couple suggestions:
Assemble the firewall on the inside of the car ie. blower motor, fuse block, etc. and then spray your sealant on the firewall before installing the engine. Sealant (undercoating) should cover every screw that comes through the firewall. The factory was sloppy about this and got sealant on brake lines, wiring, etc. Most restorers won't cover the lines and wiring!

The outside of the aprons also received sealant there too! I spray the outside aprons at the point where you are now nd then spray additional after the splash panels and fenders are installed.

Danny
 

J_Speegle

Well-known member
Joined
Jun 19, 2006
Messages
488
Looks good - some suggestions

1- Agree I would like to see more black on the front cross member with overspray on the leading face of the strut mounts - from the front

2- You overlooked /forgot the dolly marks - at least the front ones

3- The cowl/ firewall section at the back of each wheelwell would have received seam sealer before the black and sound deadener allot later after the black (after the car is just about done - minus front wheels and tires). IF its there - sorry I didn't make any out in the picture

4 - Don't agree with the body color up to the shock tower - that's a Dearborn practice from the tens of thousands San Jose I've got pictures of. Even if the body painter got carried away the engine compartment paint guy would have normally covered it.

5- Good to see allot of black in the front shock tower area


Don't check this forum often (normally once a week) so if I'm slow to reply to comments forgive me - or contact me directly. It is show season ;)
 

gt/csj4

Well-known member
Joined
Jul 8, 2012
Messages
344
Location
Westminster,CO
Bryce, looks very good. I lucked out and after knocking down all the undercoating/dirt from mine, ALL factory dabs, paint colors etc and the like were still there so I have a very good template to go off of. It's been awhile since we talked anyhow, so PM and I can send picks of my near completed underside to help you out as best I can.

Cheers,
Joe

P.S i made a trace of the dolly marks for the frame rails off mine and digitized it to make a cut out to tape it off when spraying it, and I am very happy with the results, I have the PDF for it (I printed it out and took 4'' blue tape and used a exacto knife to cut it out and place over, very easy) if you want me to send that as well
 

J_Speegle

Well-known member
Joined
Jun 19, 2006
Messages
488
Do see many reproducing the dolly marks by spraying a "natural " paint over the present red oxide and other floor colors (for other years) but if judged - the judge will see the difference. Difficult to fix/reproduce one you get paint on the car. Originally (and many now reproduce) the frame sections were galvanized so reproducing that look is find but the original stands produced a soft (non taped edge) and oversprays like body and pinch weld produced a U shaped pattern on the frame rails (due to the post that blocked the overspray - producing a shadow). Gluing a washer, using masking tape and other methods have a hard time reproducing that look.


Tools I made to reproduce the marks

Eight on the bottom of the car
Two in the trunk
Two in the interior


But, as mentioned going back to do it now - you'll have to settle for doing the best you can.


There is a full article over on the Concours site in the members area
 

gt/csj4

Well-known member
Joined
Jul 8, 2012
Messages
344
Location
Westminster,CO
Jeff what I was implying was that my cars dolly marks were still there and what I managed to do was use 000 steel wool to get them back to the "galvanized" look you mentioed. It was then, that I drew a template and digitized it. I agree if its already been painted, duplication would be difficult. I am saying that if you're starting with a clean canvas ie; completly sandblasted to bare metal, these templates are ideal. Bryce unfortunaly doesn't have that luxury but if it were me I would find as close to factory as far as the placement of said dolly marks, grind down the paint off to bare, shine it as close to original, apply either a system like yours or mine or washer method, then respray.
Hope that makes better sense then what I posted earlier. Lol
 
OP
OP
X

x-codegtcs

Well-known member
Joined
Sep 5, 2002
Messages
549
Location
Kaysville, UT
Steve - Thanks!

Danny - What goop have you used that works the best and what do you use to spray it on?

Jeff - YOU ARE THE MAN! I already was a fan from the drawings you did in the last GT/CS recognition guide (many hours of work) - but making the jigs to get the right finish! Where do you find cars to get such well representing photos? I swear that everything I have EVER seen doesn't even compare! It is usually just rust! All I have to say is "WOW"!! The photo of the red car - is that the rear frame rail? That is way up there - how did they get black paint on that? I will also add a bit more black on the front lower xmember and

Joe - I would love to get the template. As mentioned it is too late to do it right and I am more committed to top notch driver than concours restoration with the intent to make it very close. So I will just imitate the dolly marks and galvanized look on this one (it was sand blasted at one point) - but the future tells me I need to keep Jeff's info to acquire a dolly jig!

Thanks again guys!!!!
 

6t8-390gt

Well-known member
Joined
Jul 19, 2004
Messages
490
Location
Central Virginia
There are a couple different products available; most do not cover like the product and procedure they used when the car was originally made. You can do a little research. Many use either 3M or Wurth products. Both are available in spray cans or a special undercoating gun.

IIRC Jeff has done a "how to do" article over on the Concurs Forum.

Danny
 
Top