• Welcome to the CaliforniaSpecial.com forums! - You are currently viewing the forums as a GUEST. To take advantage of all our site features, please take a moment to join our community! It's fast, simple and absolutely free.

    If you have problems registering or can't log into your account, please contact Admin.

    Please Note: If you are an existing member and your password no longer works, click here to reset it.

1968 Blasting on the rotisserie - Need Primer info...

bassman2

Well-known member
Joined
Aug 13, 2009
Messages
120
Location
Camas WA
You guys are going to get sick of me soon....

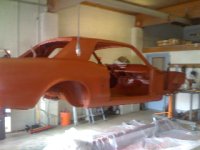
I'm blasting on the rotisserie and I just realized I can't seem to find my reference info on what gets painted Red Oxide and what gets painted black etc.

Pics soon...

OK well I found all the threads that talk about this and have read through... Here's my questions..(told you you'd get sick of me)

Can you critique my process/Give opinions as I explain here.. and possibly recommend alternatives or alternative products?!

1) Take everything down to bare metal.
2) Clean off residue from blasting material with _____? (vinegar for soda areas, what for alum oxide or sand areas?
3) Treat cleaned rusted areas with Eastwood rust converter products.
4) shoot primer on all other areas. Primer is ______? (an epoxy primer sealer red oxide
5) shoot seam sealer in all factory sealer locations
6) shoot a satin black SEM 39143 in pinch welds and other areas? (Alternatives to SEM? Eastwood chassis black?
7) Coat with sound deadener/ undercoating on wheel wells, and floor pan undersides - (necessary?)

I'm not going for perfect concourse here - but a best process to fight the northwest wet weather and longevity, while maintaining an original look.

Don't beat me up too bad, This is my first mustang project.
 
Last edited:

rvrtrash

Well-known member
Joined
Apr 25, 2003
Messages
3,650
1) Good idea.
2) I use alum oxide and then sand lightly with 600 grit. Don't use real sand to blast with. It will cause silicosis (sp?).
3) If you just bead blasted, there won't be any rust left. You'll need to weld in patches where metal is missing.
4) I use DP50 to seal the metal. You can always go over it with another color later if you want it to look original.
5) I use body caulk in the areas that need "more" filling and then cover with rubberized undercoating. I then spray the rest of the seams with the undercoating.
6) NAPA makes a chassis black that I've used for years. I swear by it.
7) I spray the entire underside with undercoating. My cars are drivers and I'm more concerned with increasing it's life than winning a trophy, and I don't live in SoCal. Concours isn't bad, just not what I'm about. Must come from being Rob's younger brother. :wink:

Steve

PS. One of my sons lives in Vancouver.
 
OP
OP
B

bassman2

Well-known member
Joined
Aug 13, 2009
Messages
120
Location
Camas WA
Thank you - I went to the local auto paint place and got all straightened out. All the stuff I used to use 20+ years ago - you can't even really buy anymore.

I got a new paintgun and a freshair system too!

Now if I can just get my eastwood blaster to work properly...WAPITA
 

J_Speegle

Well-known member
Joined
Jun 19, 2006
Messages
488
Can you critique my process/Give opinions as I explain here.. and possibly recommend alternatives or alternative products?!

1) Take everything down to bare metal.

Depends - if your cars coating on the floor pans is still decent you can repair some of the scrapes and such and shot over (after cleaning and roughing up a bit) the original finish. In this way you can save the factory drips and details - not always easy to reproduce. If not yes strip it down to metal

2) Clean off residue from blasting material with _____? (vinegar for soda areas, what for alum oxide or sand areas?
Nothing is used for most of the stripping material - just keep the pressure low and take you time (but keep the stream moving

3) Treat cleaned rusted areas with Eastwood rust converter products.
No reason to unless you have rust (that should be striped off during the cleaning process above) If you have problem areas repair them with new clean sheet metal and move on

4) shoot primer on all other areas. Primer is ______? (an epoxy primer sealer red oxide
If its still legal in your area (likely the lead free mix) that you can use the red oxide DP - many of us like to tone it towards the dirty brown for a closer to original look ;)

5) shoot seam sealer in all factory sealer locations
As long as you know what seams were originally done with a spray - as others were done with a chalking gun fixture and some were worker smooth

6) shoot a satin black SEM 39143 in pinch welds and other areas? (Alternatives to SEM? Eastwood chassis black?
For the engine compartment the single stage SEMS has not held up that well for me. If you want something tough IMHO you'll need to got to something with a hardener and depending on what is legal in your region of the country you choices may be limited

7) Coat with sound deadener/ undercoating on wheel wells, and floor pan undersides - (necessary?)
Floor pans were not coated originally that was a dealer / after market thing. The original epoxy primer has held up well on allot of cars for 40 years - Lets be honest - your not going to use or drive your car like the owner did during the 70's are you ;)

After all this work I see no reason to hide it under a coating goop. You worked hard - why hide it ???

Rear wheel wells originally got sound deadener (like the quarter panels in the trunk) BEFORE the exterior color was applied to they should the sound deadener there would have a nice coating of body color.

Front wheel wells are completely different. Could have a little (at least the firewall section, a pass from the bottom of the firewall (including the splash shield and rubber seal) and inner fender junction upwards across the inner fender to the top rear edge of the spring cover then again at the front top edge of the spring cover, down and forward on the front inner fender as well as a little or allot of covering on the front splash shield and rubber.

And additional pass was sometimes done along the bottom surface of the front fender - didn't make a difference if the car was being built for Washington state or sunny southern Cal.

This (front wheelwell sound deadener application) was all applied after the car was completely assembled - minus the front wheel and tire.


Hope this helps
 
Last edited by a moderator:
OP
OP
B

bassman2

Well-known member
Joined
Aug 13, 2009
Messages
120
Location
Camas WA
Wow thank you for the detailed response.

I'll have to look at my invoice to ID the paint codes for the primers that I was sold. I did buy from a good guy that has been in the auto paint biz since about 1980. He knew what I was looking for and wrote down some advice for adding hardner to the black etc... and he sold me a new paint gun... welcome to 2010.

I do have the seam sealer guide, but I also took tons of pics as I was disassembling the car - so I'm thinking I stand a 50/50 shot at knowing where the goop goes. I just have to buy the seam sealer and sound deadener.

I'm about half done blasting the bottom of the car - what a mess. I think the entire bottom of the car has undercoating on it.
 

J_Speegle

Well-known member
Joined
Jun 19, 2006
Messages
488
I do have the seam sealer guide, but I also took tons of pics as I was disassembling the car - so I'm thinking I stand a 50/50 shot at knowing where the goop goes. I just have to buy the seam sealer and sound deadener.

IMHO - follow what you found originally on the car the assembly manuals were just what Ford want done - not what was done ;)


I'm about half done blasting the bottom of the car - what a mess. I think the entire bottom of the car has undercoating on it.

Undercoating was a dealer or aftermarket thing in many parts of the country- not original or factory

Good luck - all the work will be worth it in the long run
 

Mosesatm

Well-known member
Joined
Jan 18, 2005
Messages
9,018
IMHO - follow what you found originally on the car the assembly manuals were just what Ford want done - not what was done ;)


Undercoating was a dealer or aftermarket thing in many parts of the country- not original or factory

Good luck - all the work will be worth it in the long run

You're saying to ignore how Ford wanted it done and instead install it as the line person decided to do it on that particular day? The guy who may have been fired the next day because he wouldn't follow the published standards and placed the stuff wherever he wanted?

It seems to me it should be installed the way it was designed by Ford - the proper way.
 

gofastguy

Well-known member
Joined
Feb 26, 2007
Messages
143
Location
Canton, Ohio
I am really glad for all of the great information on this thread. My CS is really pretty on the top, but could use freshened up underneath.
 

franklinair

Well-known member
Joined
Mar 1, 2007
Messages
4,744
Apparently there is a difference between the way the cars were actually built versus the way they were designed to be built, due to assembly line variations.
If I were to restore a car beyond the point of a 'driver' level, as compared to concourse level, I would opt for the designed correctness rather than assembly line variations and miscues. But that's just me. I've heard criticisms of "over restored" cars, but I don't agree with that philosophy.
I don't restore to what I consider concourse level. I build them to drive & enjoy. I think I come pretty close to concourse in appearance, but I do not pursue NOS parts as so many folks do for that level of restoration. And, I believe it is a healthy difference of opinion within the hobby as to what extreme we restore our cars. I don't criticise "trailer queens" because I think they are Beautiful. I just choose to drive my version.
Some folks think the car should be restored/maintained 'as it was born'. I don't. The only restrictions I place on myself is to keep it year & period correct. And some folks like to restomod. But again, that's a healthy difference of opinion within the hobby.
(OK Neil, time to get off the soapbox)

Neil
 
OP
OP
B

bassman2

Well-known member
Joined
Aug 13, 2009
Messages
120
Location
Camas WA
Well, its been 2+ months since I started this thread and I've finally primed the entire car today! Inside and out.

I will never blast my own car again. Why I ever thought it would be fun, I have no idea. I spent way more money doing it myself and well all I got out of it was satisfaction of knowing what was done right and what I rushed.

It is VERY hard to get every nook and cranny clean.

I'll start a gallery of pics once I figure out how to do it and organize all my pics.
 

Attachments

  • IMG_0354.jpg
    IMG_0354.jpg
    108.4 KB · Views: 38

rvrtrash

Well-known member
Joined
Apr 25, 2003
Messages
3,650
Believe me, I understand. I've spent every spare minute for the last month, beadblasting and painting parts. I don't mind the small stuff so much, but always have the body done by a shop. As for pics, create an account at Photobucket.com, upload your pics (full size, which is nice) and then post the link.

Steve

http://s240.photobucket.com/albums/ff158/rvrtrash/Mach1/
 
Last edited:
Top