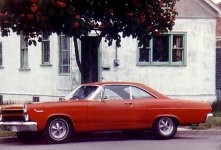
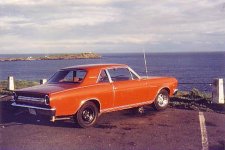
GT/CS S Code
Well-known member
"Abandon all hope ye who enter into basic repairs on 40 year old classic cars ...."

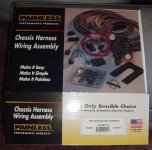
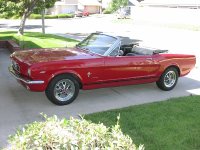
Well, we started with the very best of intentions (of course), and due to some recent electrical problems we had decided to install a completely new "Painless" wiring harness in our 68 "S" code in time for our road trip to Bellevue, Washington for the Northwest Mustang Roundup in July. I bought the proper harness and we picked the recent holiday weekend to do the job, as then I'd have three consecutive days to help my mechanic friend Chris to do the work. As a bonus my wife would be away for a two week holiday trip to Maui with three of her girlfriends, so we could concentrate on the job at hand while she was out of town. Sounds too good to be true, and of course it was.
It started off badly when we started to strip out the interior and discovered that coolant had soaked into the carpeting on the passenger side. The culprit, ... a blown heater core leaking coolant down the firewall.
OK, so we'll strip out the heater box and rebuild it at the same time. So, we ordered a new core, and a heater box seal kit, and then we'll media blast the interior of the rusty box and repaint it so that it will be completely rebuilt. Of course the 40 year old hardboard plenum box is toast too, so we'll order a new replacement for the toasted one. Might as well replace all the heater hoses too while we're at it, and both of the radiator hoses too so that it is all fresh.
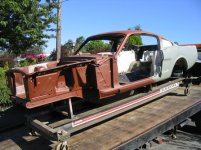
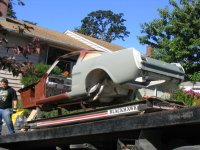
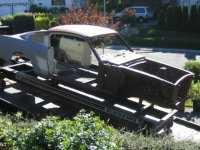
Once the interior was stripped out we discover that there were rust pinholes in the front floorboards, and with a further look found that the torque boxes were also in fairly tough shape too. OK order two new replacement torque boxes and front replacement patch panels for both of the front floors. What the heck, we've already got the car half apart anyway, so let's do it now while it's all readily accessible, right?
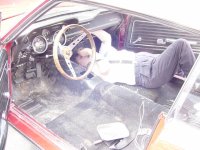
Next, strip out the rest of the dash to access the old wiring harness and remove it. We discovered that we also need to replace a set of broken heater control cables and to deal with some issues with the existing dash pod and gauges. Order those needed parts.
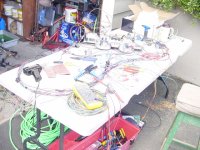
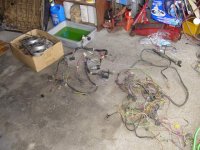
We started comparing the old wiring harness with the new "Painless" harness and there are some differences between the two? What? Hmmm? OK, dig through the spare parts that came with the car and discover that the original harness has been removed at some point and replaced with a different harness (a 67 ?), but at least the old original harness is still there. Remove all the connectors from the old harness to install on the new "Painless" harness so that stock Ford components will "plug in" if we ever need to replace anything in the electrics again.
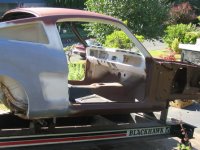
Remove the door panels in preparation of the floorboard welding work, and discover that there are some missing parts in the driver's side window mechanism, and that the shaft for the door handle is mostly stripped out and holding by about 1/2 a thread. OK. Order some more replacement parts .... and what the heck, a pair of new black door panels since the old ones are a bit "tatty", and the parts that are missing from the remote driver's side mirror adjuster, and while you're at it new brake, clutch, and accellerator pads since they're worn out too.
While we're at it, we might as well order a bushing kit for the pedal shaft assembly too, since they're worn out and the pedals are fairly sloppy on the shaft.
Then due to the "haywire" wiring modifications by a previous owner, a new coil to replace the old one, and a new starter solenoid, a new oil pressure sensor, and a new water temperature sensor too.
Then, since the front bucket seats are out of the car anyway, let's recover them since they have a few tears and replace the cushions since they are 40 years old after all.
Then, since the interior is stripped out for the rest of the work, let's order a brand new headliner to replace the old tatty one too, and a new dome light bezel and lens to replace the old deteriorated one.
What the heck, let's order new scuff plates too, since those old ones are scratched and dented, and also a new battery tray to replace the old rusty one from a previous battery that leaked acid onto it and corroded it up badly.
I guess we should install an export brace to go along with the existing Monte Carlo bar too, to tiddle things up under the hood and improve the handling.
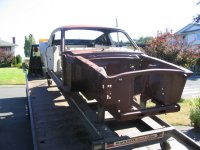
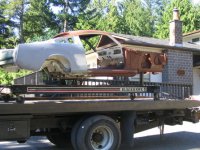
So, about this Wednesday, our poor "stripped out" car will finally head out to the body shop, have the front floor patch panels and new torque boxes installed, have the new headliner installed, have the new set of restored GT chrome wheels installed to replace the current mag wheels, have the new rolled tip GT exhausts installed, and have the metal interior door panels sprayed black.
When it finally gets back home, we'll attack the re-installation of the new and improved "Painless" wiring harness, the rebuilt gauges and dash pod, the rebuilt heater box and controls, the rebuilt interior and seats, and install the new interior trim pieces along with the remaining old parts still in good condition.
Then we'll deal with the brake proportioning valve that has tripped and is no longer centred .... oh, did I forget to mention that we discovered that too?
... and we'll re-install the missing choke plate and choke controls that were missing from the carb too! (Again, the good news is that I actually had the missing parts in my personal stash of spare carb parts and pieces ....)
Once it's all reassembled and back in one piece, we'll do some basic engine tuning and give the front and rear brakes a once over to check their general condition just to be safe.
At that point we should be all finished for now, and ready for the road trip to Bellevue in July ... but I'd rather have found out about all these "hidden" problems now and take care of them while the car is apart for the basic wiring job, rather than tear it down multiple times in future and fix them one at a time. Worse yet, we could have had a major break down on the road and worse yet, a major "out of town" break down!
I cannot possibly thank my good friend and mechanic "Chris" or my body and paint man "Kevin" nearly enough for all their help and patience in dealing with "the never ending repair job" of the last few weeks.
By the way, the "Painless" wiring harness is very high quality and was worth every cent for the peace of mind a brand new up to date system will give us.
... but the next time you plan to do ONE "simple' job on your 40 year old car, and hope to get it all done over a three day holiday weekend, don't be at all surprised if 'Mr. Murphy" arrives and throws a wrench right in the middle of it all!
We'll keep you posted as to the final results over the next few weeks, but at this point it appears that I'll have spent considerably more on our car in the last two weeks on replacement parts and labour than my wife spent on her entire two week holiday trip to Maui with her girlfriends!
We'll see some of you soon down in Bellevue, Washington in July!
Well, we started with the very best of intentions (of course), and due to some recent electrical problems we had decided to install a completely new "Painless" wiring harness in our 68 "S" code in time for our road trip to Bellevue, Washington for the Northwest Mustang Roundup in July. I bought the proper harness and we picked the recent holiday weekend to do the job, as then I'd have three consecutive days to help my mechanic friend Chris to do the work. As a bonus my wife would be away for a two week holiday trip to Maui with three of her girlfriends, so we could concentrate on the job at hand while she was out of town. Sounds too good to be true, and of course it was.
It started off badly when we started to strip out the interior and discovered that coolant had soaked into the carpeting on the passenger side. The culprit, ... a blown heater core leaking coolant down the firewall.
OK, so we'll strip out the heater box and rebuild it at the same time. So, we ordered a new core, and a heater box seal kit, and then we'll media blast the interior of the rusty box and repaint it so that it will be completely rebuilt. Of course the 40 year old hardboard plenum box is toast too, so we'll order a new replacement for the toasted one. Might as well replace all the heater hoses too while we're at it, and both of the radiator hoses too so that it is all fresh.
Once the interior was stripped out we discover that there were rust pinholes in the front floorboards, and with a further look found that the torque boxes were also in fairly tough shape too. OK order two new replacement torque boxes and front replacement patch panels for both of the front floors. What the heck, we've already got the car half apart anyway, so let's do it now while it's all readily accessible, right?
Next, strip out the rest of the dash to access the old wiring harness and remove it. We discovered that we also need to replace a set of broken heater control cables and to deal with some issues with the existing dash pod and gauges. Order those needed parts.
We started comparing the old wiring harness with the new "Painless" harness and there are some differences between the two? What? Hmmm? OK, dig through the spare parts that came with the car and discover that the original harness has been removed at some point and replaced with a different harness (a 67 ?), but at least the old original harness is still there. Remove all the connectors from the old harness to install on the new "Painless" harness so that stock Ford components will "plug in" if we ever need to replace anything in the electrics again.
Remove the door panels in preparation of the floorboard welding work, and discover that there are some missing parts in the driver's side window mechanism, and that the shaft for the door handle is mostly stripped out and holding by about 1/2 a thread. OK. Order some more replacement parts .... and what the heck, a pair of new black door panels since the old ones are a bit "tatty", and the parts that are missing from the remote driver's side mirror adjuster, and while you're at it new brake, clutch, and accellerator pads since they're worn out too.
While we're at it, we might as well order a bushing kit for the pedal shaft assembly too, since they're worn out and the pedals are fairly sloppy on the shaft.
Then due to the "haywire" wiring modifications by a previous owner, a new coil to replace the old one, and a new starter solenoid, a new oil pressure sensor, and a new water temperature sensor too.
Then, since the front bucket seats are out of the car anyway, let's recover them since they have a few tears and replace the cushions since they are 40 years old after all.
Then, since the interior is stripped out for the rest of the work, let's order a brand new headliner to replace the old tatty one too, and a new dome light bezel and lens to replace the old deteriorated one.
What the heck, let's order new scuff plates too, since those old ones are scratched and dented, and also a new battery tray to replace the old rusty one from a previous battery that leaked acid onto it and corroded it up badly.
I guess we should install an export brace to go along with the existing Monte Carlo bar too, to tiddle things up under the hood and improve the handling.
So, about this Wednesday, our poor "stripped out" car will finally head out to the body shop, have the front floor patch panels and new torque boxes installed, have the new headliner installed, have the new set of restored GT chrome wheels installed to replace the current mag wheels, have the new rolled tip GT exhausts installed, and have the metal interior door panels sprayed black.
When it finally gets back home, we'll attack the re-installation of the new and improved "Painless" wiring harness, the rebuilt gauges and dash pod, the rebuilt heater box and controls, the rebuilt interior and seats, and install the new interior trim pieces along with the remaining old parts still in good condition.
Then we'll deal with the brake proportioning valve that has tripped and is no longer centred .... oh, did I forget to mention that we discovered that too?
... and we'll re-install the missing choke plate and choke controls that were missing from the carb too! (Again, the good news is that I actually had the missing parts in my personal stash of spare carb parts and pieces ....)
Once it's all reassembled and back in one piece, we'll do some basic engine tuning and give the front and rear brakes a once over to check their general condition just to be safe.
At that point we should be all finished for now, and ready for the road trip to Bellevue in July ... but I'd rather have found out about all these "hidden" problems now and take care of them while the car is apart for the basic wiring job, rather than tear it down multiple times in future and fix them one at a time. Worse yet, we could have had a major break down on the road and worse yet, a major "out of town" break down!
I cannot possibly thank my good friend and mechanic "Chris" or my body and paint man "Kevin" nearly enough for all their help and patience in dealing with "the never ending repair job" of the last few weeks.
By the way, the "Painless" wiring harness is very high quality and was worth every cent for the peace of mind a brand new up to date system will give us.
... but the next time you plan to do ONE "simple' job on your 40 year old car, and hope to get it all done over a three day holiday weekend, don't be at all surprised if 'Mr. Murphy" arrives and throws a wrench right in the middle of it all!
We'll keep you posted as to the final results over the next few weeks, but at this point it appears that I'll have spent considerably more on our car in the last two weeks on replacement parts and labour than my wife spent on her entire two week holiday trip to Maui with her girlfriends!
We'll see some of you soon down in Bellevue, Washington in July!